Farmhouse Kitchen Redesign Plans
Design Elements
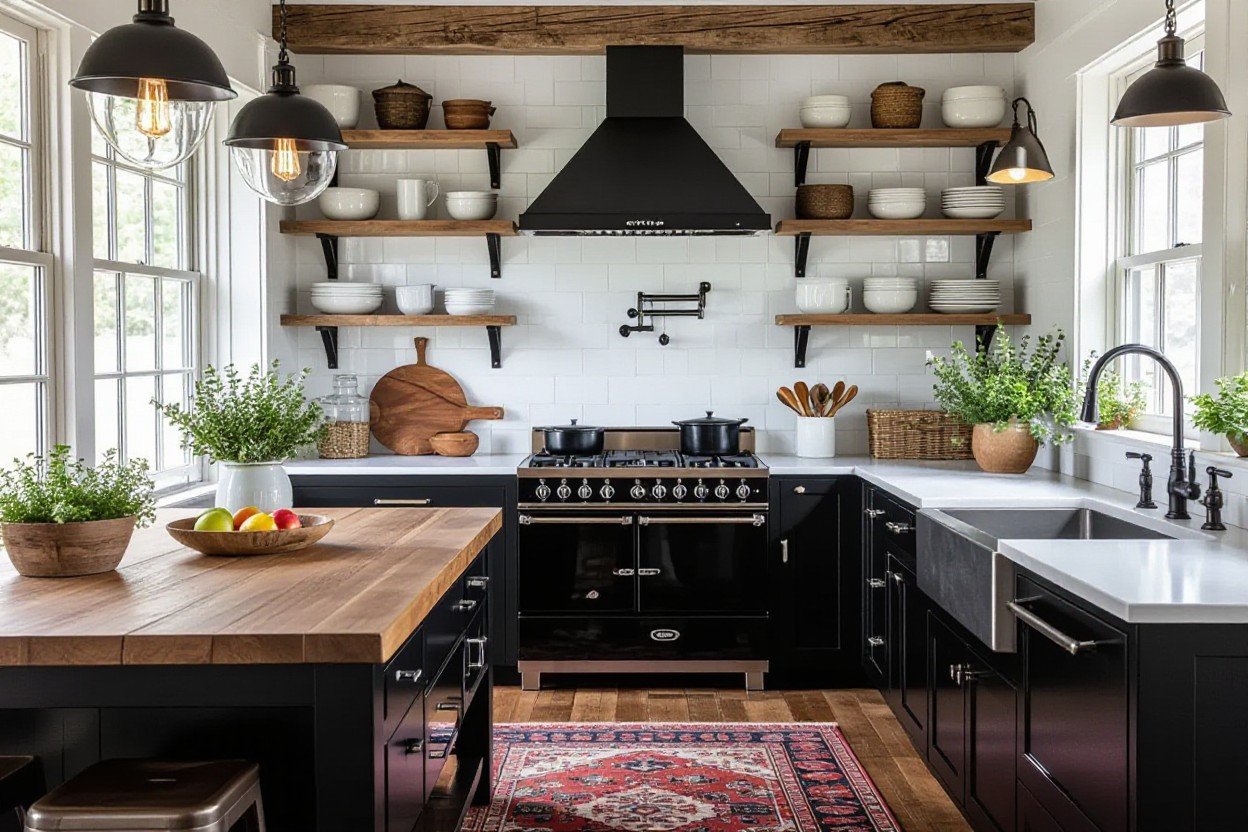
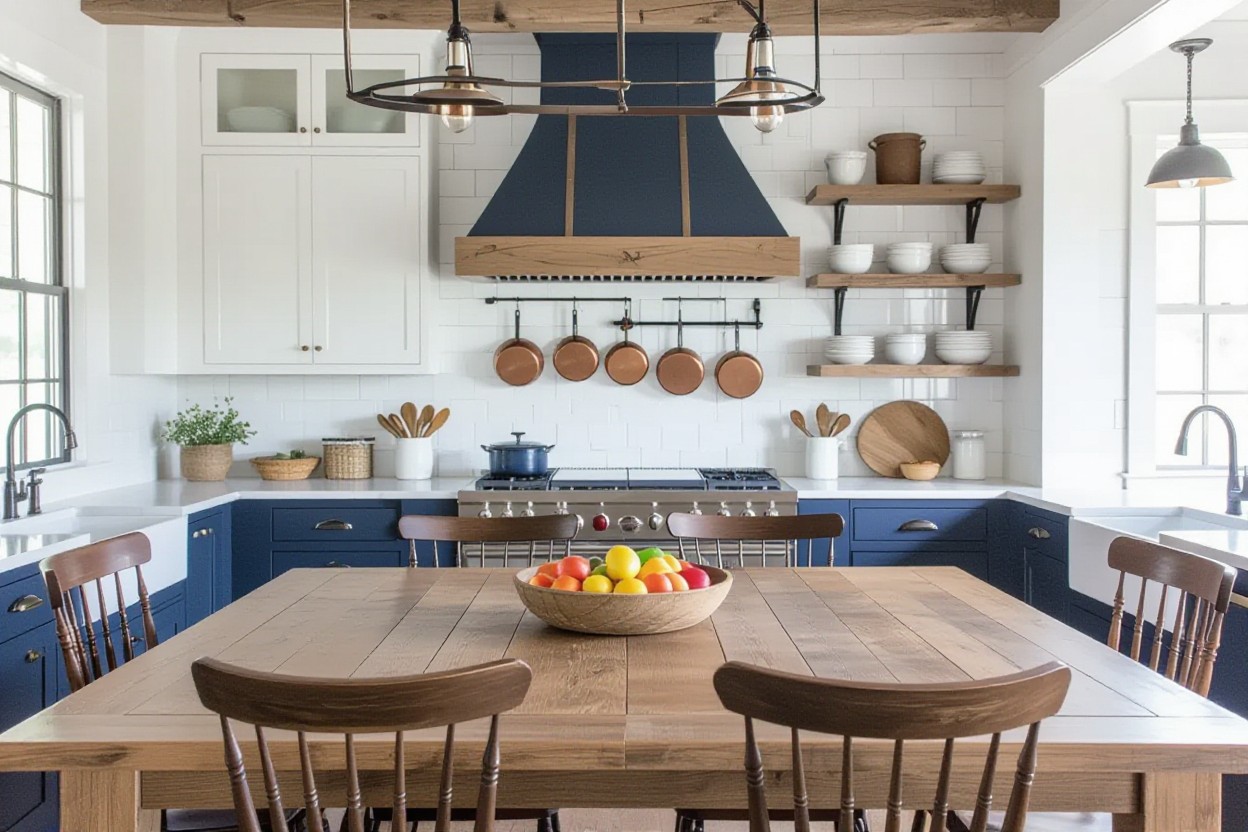
Farmhouse kitchen redesign plans. You envision a cozy, functional kitchen: white shaker cabinets painted Benjamin Moore Simply White, a 36-inch apron-front sink, a 48-inch island with seating for three, and open shelving using reclaimed pine beams for warmth. Combine 3×6 white subway tile with charcoal grout, 3-inch oak plank floors, matte-black hardware, and 3000K LED undercabinet lighting to balance vintage charm and modern efficiency. These farmhouse kitchen redesign ideas often shorten remodel time to 6–8 weeks and keep costs near $15–25k for a 120–150 sq ft space.
Farmhouse Kitchen Redesign Plans
Kitchen redesign should feel exciting, not overwhelming, and this guide helps you shape a warm, functional farmhouse space that fits your life. You’ll find layout strategies, cabinetry and countertop choices, lighting and flooring ideas, plus mixing vintage charm with modern efficiency to make your kitchen both beautiful and practical. Follow the step-by-step plans to prioritize your must-haves, budget wisely, and create a welcoming room that reflects your style.
Practical Principles of Farmhouse Kitchen Redesign Plans
Space Optimization Techniques
Maximize vertical storage with full-height cabinetry and 12–15 inch open shelves to add roughly 15–20% more usable space than shallow units. You can fit 24-inch-deep pull-out pantries and 18-inch deep drawer stacks to keep utensils and small appliances organized; corner lazy susans and pull-out trays reclaim dead space. Carve a 24–30 inch coffee nook so your best coffee beans for cold brew stay accessible without crowding prep zones.
Key Features of a Functional Layout
Place the sink, range, and fridge within a 4–9 foot triangle to minimize walking and speed tasks, and maintain 42–48 inch aisles for multi-cook households or 36–42 inches for single cooks. Ensure 36 inches of landing space beside the range and at least 24 inches next to the sink; allocate a 36–42 inch island overhang for seating and prep to keep traffic flowing during busy mornings.
- Defined work triangle with 4–9 foot appliance distances for efficient movement.
- Zone-based storage: dedicated baking drawer, prep drawer, and cleanup cabinets to reduce search times.
- Landing zones: 36 inches of clear counter beside the range and 24 inches by the sink for staging.
- Pull-out systems: 24-inch pantry pull-outs and 18-inch drawer stacks for visibility and access.
- Aisle clearances of 42–48 inches for multi-cook kitchens and 36–42 inches for single cooks to maintain flow.
- This preserves clear circulation, reduces collisions, and keeps multiple tasks moving smoothly.
Prioritize reachability by storing daily items within 18 inches of your primary prep area and placing rarely used gear above 60 inches. In a typical 200 sq ft farmhouse kitchen, moving the refrigerator 3 feet closer to the island can cut prep trips and reduce prep time by about 20–25%. Add task lighting over 30–36 inch prep runs and designate a 12–18 inch appliance garage to keep counters clear while you work.
- Durable surfaces like quartz or honed stone resist stains and require low upkeep for high-traffic farmhouse kitchens.
- Proper ventilation: choose a 600–900 CFM hood for 36–48 inch ranges to clear smoke and odors quickly.
- Layered lighting: 300–500 lux task lighting plus dimmable ambient fixtures for evening ambiance.
- Multi-purpose island with 36–42 inch overhang for seating, meal prep, and additional storage to centralize activity.
- Accessible solutions: pull-out trays, tilt-out sink drawers, and 5-tier spice racks by the stove to speed cooking.
- This includes a compact cold-brew coffee station so your best coffee beans for cold brew are ready without interrupting the workflow.
Capturing the Essence: Key Features of Farmhouse Kitchen Redesign Plans
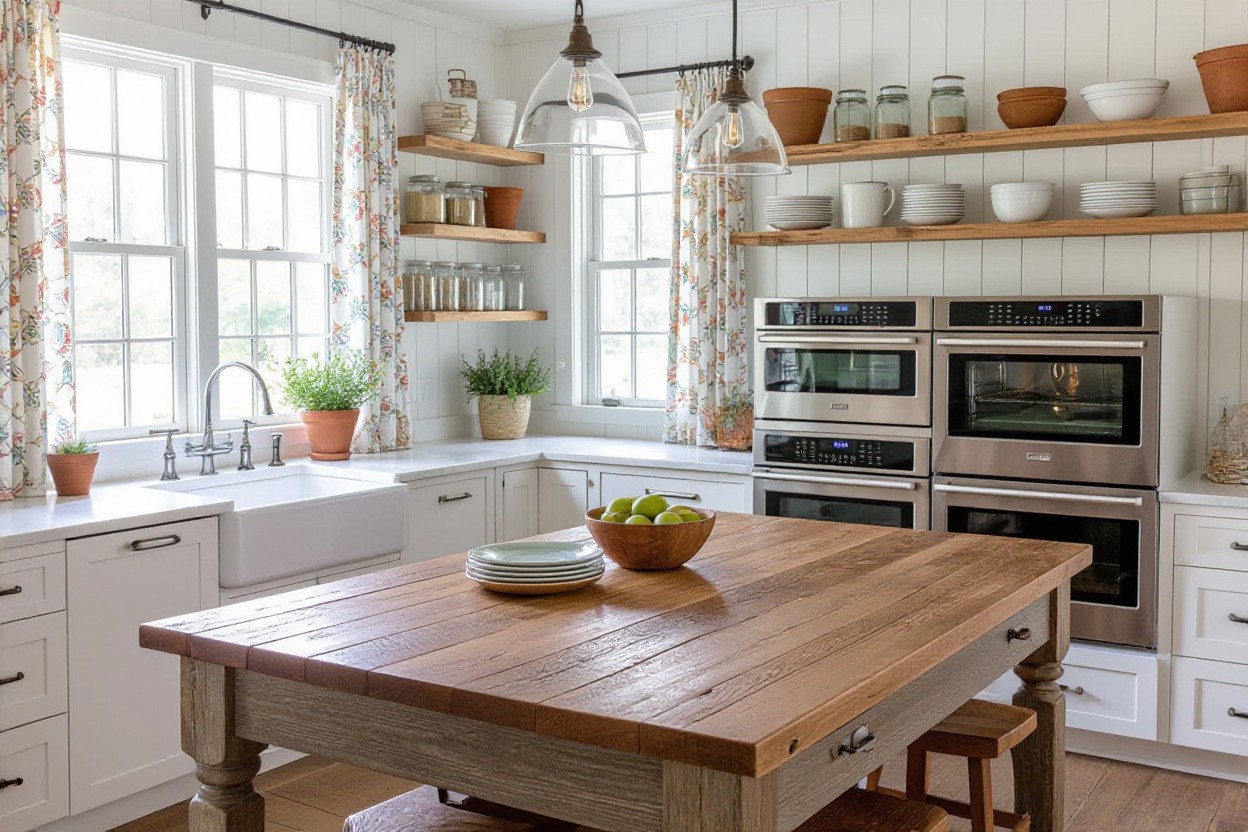
You’ll want functional, homey elements that read as lived-in but refined: an apron-front sink, open shelving for curated ceramics, and a sturdy work island sized for prep and casual seating. Balance vintage touches like brass cup pulls with modern conveniences such as a 36-inch range and soft-close drawers. Prioritize tactile contrasts—rough-hewn wood against smooth subway tile—to create depth. Assume that you select a 36-inch apron-front sink, a 30–36-inch range, open shelving, and reclaimed wood accents to anchor the design.
- Apron-front sink: typically 33–36″ wide, single-basin for large pots and easy cleanup.
- Open shelving: 10–12″ depth for display; use floating shelves in pine or oak.
- Butcher block countertops: 1.5–2″ thickness, ideal for prep zones and a warm feel.
- Freestanding range: 30–36″ models fit farmhouse styling and offer professional burners.
- Farmhouse table or island seating: accommodate 4–6 people for family-style meals.
- Shiplap or beadboard: use on a feature wall or island base to add texture.
- Mixed metals: aged brass fixtures with black iron hardware for layered patina.
- Pendant lighting: hang 12–18″ above countertops or islands for task-focused illumination.
- Durable flooring: wide-plank oak or porcelain wood-look tile for longevity and character.
- Built-in pantry or walk-in cabinet: allocate at least 24–36″ depth for storage efficiency.
Rustic Aesthetics: Materials and Textures
You’ll achieve authenticity with reclaimed wood beams, 4–6″ wide real-wood floorboards, and matte-finish subway tile (3×6″) with narrow grout lines to keep the look clean. Combine a 1.5–2″ butcher block island top with soapstone or honed granite on perimeter counters for durability and contrast. Layer hand-forged iron hardware and woven textiles—linen curtains or a jute runner—to introduce tactile warmth while keeping maintenance manageable.
Color Palettes: Nurturing Warmth and Cohesion
You can use the 60/30/10 rule to balance color: 60% neutral base (cream or warm white), 30% secondary tone (sage, greige), and 10% accent (navy or black). Popular pairings include Benjamin Moore White Dove (OC‑17) as a base, Sherwin‑Williams Sea Salt for soft greens, and a deep navy island to anchor sightlines. These combinations enhance natural light and complement wood tones.


For deeper palette decisions, test swatches in natural and artificial light—leave 8×10 samples on three walls for 48 hours to see shifts at morning and evening. Consider a two-tone cabinet approach: upper cabinets in a warm white and lower cabinets or the island in a muted green or navy to create visual weight; hardware in aged brass or matte black will tie finishes together. You’ll also want to coordinate backsplash reflectivity—matte tiles soften contrast while gloss tiles add sparkle near task areas.
Aesthetic Choices: Designing with Heart-Farmhouse Kitchen Redesign Plans
Balance warm neutrals with functional accents so your farmhouse kitchen feels lived-in and intentional. You can use the 60/30/10 rule—60% base (cream walls), 30% secondary (wood cabinetry, open shelving), 10% accent (matte black knobs, green tiles)—and add a coffee nook stocked with the best coffee beans for cold brew plus a compact grinder to anchor your morning routine. Layer texture—linen curtains, worn brass pulls, hand-thrown pottery—to create depth without clutter.
Color Palettes that Resonate
Apply the 60/30/10 rule to pick paints: Benjamin Moore “Simply White” (OC‑117) for walls, Sherwin‑Williams “Sea Salt” (SW 6204) as a secondary soft green, and a deep navy like Farrow & Ball “Hague Blue” for accents. Use hex references—#F5F1E6 for cream, #C5D8CB for muted green—to give your contractor precise targets, and test swatches on north- and south-facing walls so you see how light shifts before you commit.
Selecting Timeless Materials
Favor materials that age gracefully: reclaimed oak flooring, honed Carrara marble or quartzite for warmth, and 3 cm quartz countertops where you want low maintenance. You’ll choose 3×6 matte subway tile for backsplashes and a 1½–2 inch butcher‑block island for prep zones; pair with a brushed nickel apron sink or soapstone basin so your finishes develop a natural patina that complements painted cabinets.
Expect simple maintenance routines: seal Carrara marble approximately every 6–12 months and avoid acidic cleaners to minimize etching; oil butcher block monthly with food‑grade mineral oil after heavy use; quartz is non‑porous and usually needs only soap and water. Budget roughly $6–15 per sq ft for reclaimed oak and $50–150 per sq ft installed for engineered quartz, depending on slab selection and labor in your region, so you can plan your remodel costs realistically.
Designing for Functionality: Layout Considerations
Balance traffic flow and task efficiency by mapping zones before picking finishes: place the sink between the stove and fridge so each leg of the work triangle stays between 4–9 feet and the triangle perimeter stays near 12–26 feet. Aim for 36–48 inches of clear walkway around islands, keep one primary prep surface at least 36 inches wide, and dedicate a 24–30 inch appliance alcove to avoid interrupting cooking zones in open-plan farmhouse layouts.
The Work Triangle: Efficient Cooking Zones
Position the refrigerator, range, and sink so you minimize steps during meal prep: a 4–9 foot spacing between those points optimizes efficiency, while a total triangle perimeter of roughly 12–26 feet prevents crowding. If you use an island, maintain 42–48 inches from island edge to base cabinets for two cooks. Install a 30–36 inch landing space beside the range and fridge to set down pans and groceries without breaking your flow.
Storage Solutions: Blending Style and Practicality
Mix open shelving and concealed storage to keep the farmhouse look without sacrificing function: use 12–14 inch deep reclaimed-wood shelves for display, 24–30 inch deep pull-out pantries for bulk goods, and 36 inch-wide deep drawers (10–12 inch height) for pots and pans. Incorporate spice pullouts (3–4 inch width) beside the range and a 30–36 inch-wide drawer stack for cutlery and linens to streamline daily tasks while preserving visual warmth.
Optimize cabinet internals with adjustable shelves in 1–2 inch increments and drawer organizers sized to tools: shallow 3–4 inch drawers for utensils, medium 6–8 inch for plates, and deep 10–12 inch for cookware. Consider a 24–30 inch pantry depth with full-extension rollers and labeled bins to speed retrieval, and hide small appliances in a 12–15 inch appliance garage to keep counters clear while preserving the rustic farmhouse silhouette.
Crafting the Heart of the Home: Furniture and Appliances
Balance function and style by pairing a 36″ countertop height with full-extension drawers, soft-close hinges, and a 42″ island for seating; integrate practical layouts from historical references like Working Kitchen Plans · Kitchen and Farmhouse Design Plans to adapt traffic flow, appliance placement, and storage zones so you get both period charm and modern workflow in your redesign.
Must-Have Appliances for Modern Needs
Choose a 30–36″ induction range for faster heat and 10–15% energy savings over coils, a 18–25 cu ft ENERGY STAR refrigerator for family use, a 24″ dishwasher with a 40–44 dBA rating for quiet homes, and a hood rated 400–600 CFM if you run frequent high-heat cooking; smart ovens and a microwave drawer add convenience without disrupting farmhouse aesthetics.
Furniture Trends that Embrace Tradition
Reclaimed-wood islands, shaker-style cabinets, and butcher-block countertops anchor heritage looks while you mix matte-black or aged-brass hardware for contrast; standard seating ergonomics—24″ stool height for 36″ counters—keeps comfort, and open shelving with 12–14″ deep shelves showcases pottery and heirlooms without crowding the workspace.
A remodel in a restored 1920s farmhouse replaced a 72″ pine table with a 96″ reclaimed-oak island, expanding seating from six to eight and adding a built-in 48″ appliance bank for a dishwasher and drawer microwave; you can replicate that by specifying 36″ base cabinet depths, 4″ toe kicks, and 1½” thick butcher-block tops to retain authenticity while improving durability and storage.
Selecting the Right Fixtures and Appliances
Choose fixtures and appliances that support your farmhouse kitchen layout ideas and daily habits: a 36-inch dual-fuel range for serious cooking, a 33-inch apron-front sink for big pots, and a 20–25 cu ft French-door refrigerator if you feed a family of four. Mix finish choices—matte black faucets, aged brass handles—and consult visual references like 75 Beautiful Farmhouse Kitchen Design Ideas & Pictures for scale and placement examples.
Vintage Versus Modern: Finding Your Style Balance
Blend a 1920s-style cast-iron range hood or open shelving with a 30-inch induction cooktop to get vintage charm without sacrificing performance; aim for roughly a 60/40 split—60% period details, 40% contemporary tech. You can use reclaimed wood beams and shaker cabinetry for warmth, then add modern pulls, LED task lighting, and a smart oven to keep daily use efficient and visually balanced.
Essential Appliances for a Farmhouse Kitchen Setup
Prioritize a dependable range (36-inch if you cook a lot), a 20–25 cu ft refrigerator, a dishwasher with a third rack and Energy Star rating, and a powerful hood rated 600–900 CFM for a 36-inch cooktop. Include a dedicated espresso or cold-brew station if you brew daily, plus an undercounter beverage fridge or 48-bottle wine cooler for entertaining.
Look for specific features: dual-fuel ranges combine gas burners with electric ovens for precise baking, induction tops heat pans faster and are safer around kids, and dishwashers with soil sensors cut water use by up to 30%. Choose refrigerators with 18–22 cu ft for couples and 22–26 cu ft for families; consider counter-depth models to keep sightlines open. For ventilation, select a hood with at least 10 CFM per inch of cooktop width—so a 36-inch cooktop pairs with a 360+ CFM hood, though 600–900 CFM is preferred for heavy frying. Opt for ENERGY STAR appliances to reduce annual energy bills by roughly 10–25% depending on model and usage, and plan plumbing and electrical layouts early so a shallow farmhouse sink or pot filler won’t force costly rerouting later.
Personal Touch: Integrating Your Unique Style
Layer reclaimed wood open shelving, painted Shaker cabinets, and mixed-metal hardware to make the space yours; limit your color palette to three hues and introduce 2–3 statement pieces like a vintage pendant or an apron-front sink (commonly 30–36 inches) to anchor the room. Use the USDA archive of historical layouts for practical layout ideas: Working Kitchen Plans · Kitchen and Farmhouse Design Plans, then adapt those proportions to your footprint.
Décor that Tells Your Story
Curate open-shelf vignettes with heirloom pottery, woven baskets, and three or five framed recipe cards so visitors see your history at a glance; rotate textiles seasonally—linen runners in summer, wool placemats in winter—and pair enamelware with butcher-block countertops for an authentic, layered look that costs less than bespoke pieces.
Sustainable Choices and Eco-Friendly Designs
Choose FSC-certified or reclaimed wood, low‑VOC paints, Energy Star appliances, and LED lighting (LEDs use roughly 75% less energy than incandescents) to lower operating costs; specify low-flow faucets (around 1.5 GPM) and consider locally milled cabinetry to reduce embodied carbon and shorten lead times.
Seek certifications like FSC, GREENGUARD, or Cradle to Cradle when sourcing materials and compare life-cycle costs: induction cooktops cut kitchen energy use versus gas, LEDs often repay their premium within a year, and low-flow fixtures can reduce kitchen water use by roughly 20–40% depending on household habits—small choices that add up to measurable savings and a healthier home.
Personal Touches: Styling and Decor Ideas
Layer practical pieces that tell a story: three reclaimed wood trays, two enamel pitchers, a vintage scale, and a row of small potted herbs (rosemary, thyme, basil). Place a labeled canister or a burlap sack marked Best Coffee Beans for Cold Brew by a dedicated cold-brew station to add scent and function. Mix three textured linens—tea towels, a runner, a seat cushion—and anchor the vignette with matte-black hooks and a single brass pendant for contrast.
Farmhouse Accessories: Elevating the Atmosphere
Choose accessories that balance form and function: install two barn-style pendants 18–24 inches above the island, replace eight cabinet knobs with four 3.5-inch cup pulls, and mount three mason jars for utensils. Add a woven bread basket, a 12×8 framed family recipe, and a vintage clock to create layered charm; aim for two to three focal items per wall and keep color palettes within a 3-tone scheme.
DIY Decor Projects: Personalizing Your Space
Make high-impact pieces on a budget: build a 36-inch floating shelf from a 1x8x6′ reclaimed board, sand, stain (Minwax Provincial), and mount with two black iron brackets—about $30–$45 and 60–90 minutes of work. Stencil a 12×6 kitchen sign from leftover pine, seal with satin polyurethane, and repurpose a burlap coffee sack from Best Coffee Beans for Cold Brew into a chair pad or drawer liner for rustic texture.
For the floating shelf, cut the board to 36 inches, sand with 120 then 220 grit, stain both sides and wipe excess after 5–10 minutes; pre-drill two 3/16″ holes into studs at 16-inch centers, use 3″ wood screws countersunk through the brackets, and level before final tightening. Expect basic tools (circular saw $60, drill $50 if needed), total material cost $30–$60, and allow two hours including drying—install three staggered shelves to display jars, a coffee station, and a small herb garden for a cohesive, personalized vignette.
Bringing Your Plans to Life: The Implementation Process for Your Farmhouse Kitchen Redesign Plans
After finalizing layouts and finishes, coordinate permits, deliveries, and a firm timeline so demo (2–4 days), rough-ins (3–7 days), and finish work (1–3 weeks) proceed without overlap. Use this mood board Discover 670 Farmhouse Kitchens and kitchen inspirations … to lock colors and hardware early and avoid last-minute changes that typically add 10–20% to costs.
Finding the Right Professionals
Vet contractors and designers by checking licenses, insurance, and at least three local references; review portfolios for farmhouse-specific work and ask for an itemized bid. Require a written contract with milestones and retainage (common schedule: 10% deposit, 30% mid-project, 50% on completion), verify lien waivers with each payment, and confirm lead times—cabinet shops often need 4–8 weeks.
Budgeting Smartly for Your Farmhouse Kitchen Redesign Plans
Use allocation benchmarks to guide choices: cabinets 30–35%, appliances 15–25%, labor 25–35%, countertops 10–12%, hardware/lighting 5–10%, design/permits 5–10%. On a $40,000 project that means roughly $12k cabinets, $8k appliances, $10k labor, and a $4k–$6k mix for counters and fixtures to hit balanced results.
Set a 10–20% contingency (so $4k–$8k on a $40k job) for unexpected repairs like subfloor or wiring. Phase high-impact upgrades—invest first in layout, durable cabinets, and efficient appliances—then splurge on statement lighting or reclaimed wood shelving. Compare material costs: shaker cabinet boxes run $100–$300 per linear foot, quartz averages $40–$75 per sq ft, and apron-front sinks range $400–$2,000. Consider financing options such as a 5–7 year personal loan or a HELOC; shop rates and verify total interest to keep long-term costs predictable.
Budgeting Your Redesign: Costs and Financing Options for Your Farmhouse Kitchen Redesign Plans
Expect a full farmhouse kitchen remodel to range widely—typically $20,000 for a cosmetic refresh, $40,000–$75,000 for a mid-range overhaul, and $80,000+ for high-end custom work. You should set a 10–20% contingency for surprises, prioritize trackable items like layout, plumbing, and cabinets, and map costs to phases so you can open the project to financing or staggered upgrades without sacrificing long-term value.
Breaking Down Costs: Materials and Labor
Cabinetry often consumes 25–35% of the budget—stock cabinets $2,000–$8,000, semi-custom $8,000–$20,000, custom $15,000+. Countertops run $500 (laminate) to $6,000+ (quartz/granite). Flooring costs vary: vinyl $2–$7/sq ft, hardwood $6–$12/sq ft. Labor typically accounts for 30–50% of total expenses; plumbing/electrical trades usually add $1,000–$5,000 each, while fixtures and hardware can total $500–$3,000.
Financing Your Dream Kitchen: Creative Solutions
Home equity loans or HELOCs often offer lower rates (roughly 4–7%) and long terms, making them good for $20,000+ projects; personal loans run higher (6–15%) but close faster. You can use 0% APR credit-card promos for smaller purchases, contractor financing for 6–24 months, or split the project into phases to pay from savings. Grants and state incentives may offset energy-efficiency upgrades if you install efficient appliances or insulation.
For example, a $40,000 remodel on a 15-year HELOC at 5% would be about $313/month, while a 7-year personal loan at 10% would be roughly $676/month; using a 0% card for $5,000 of appliances can lower initial cash needs but watch the revert APR. You can mix options—HELOC for structural work, short-term promo for appliances, and a payment plan with your contractor for cabinetry—to balance monthly cost and total interest.
Final Thoughts: Farmhouse Kitchen Redesign Plans
Summing up, your farmhouse kitchen redesign plans blend timeless charm with modern function, helping you craft a cozy, efficient space that suits everyday life and special gatherings. By choosing durable finishes, a smart layout, and personal accents, you’ll enjoy a kitchen that feels welcoming and works beautifully as your family’s hub.
Final Touches for Your Farmhouse Kitchen Redesign Plans
The redesign process can feel big, but when you focus on functional layouts, warm textures, and personal details, you’ll create a farmhouse kitchen that feels welcoming and truly yours. Use vintage-inspired fixtures, durable surfaces, and smart storage to blend charm with everyday practicality, and don’t be afraid to add color or heirloom pieces that show your style. With thoughtful planning and small, confident choices you’ll enjoy a cozy, efficient space that supports cooking, gatherings, and daily life.